Last modified on: Thu, 21st May, 2026 at 07:00 PM
Prerequisites
-
Snowflake account with a user that has read access to the target table or view
-
Account identifier, Username, Warehouse, Database, Schema, and Table/View name — retrieve these using the SQL commands below
- Snowflake Guide: https://docs.snowflake.com/en/user-guide/gen-conn-config
-
RSA Private Key (PEM format) — Adriel uses key-pair authentication; password-based login is not supported
- Snowflake Guide: https://docs.snowflake.com/en/user-guide/key-pair-auth
Prerequisite - (2): Retrieve Connection Settings via SQL
Run the following queries in a Snowsight worksheet to gather the values needed in Steps 3 and 4. (Reference: Snowflake connection settings guide ↗)
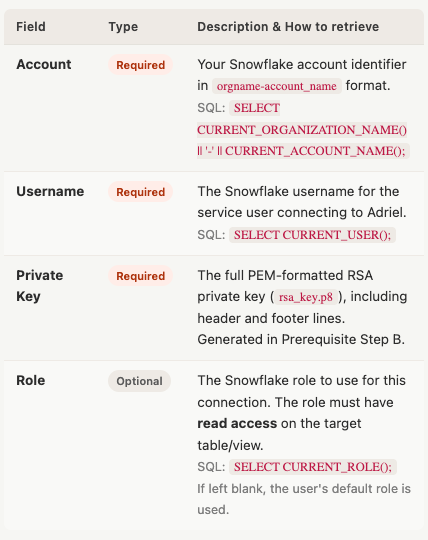
-- Account identifier (use the orgname-account_name format)
SELECT CURRENT_ORGANIZATION_NAME() || '-' || CURRENT_ACCOUNT_NAME();

-- Current username
SELECT CURRENT_USER();

-- Current role
SELECT CURRENT_ROLE();

-- Current warehouse
SELECT CURRENT_WAREHOUSE();

-- Current database
SELECT CURRENT_DATABASE();

-- Current schema
SELECT CURRENT_SCHEMA();
Prerequisite - (3): Generate an RSA Private Key for key-pair authentication
1. Generate a private key (unencrypted recommended for service integrations):openssl genrsa 2048 | openssl pkcs8 -topk8 -inform PEM -out rsa_key.p8 -nocrypt
2. Generate the matching public key:openssl rsa -in rsa_key.p8 -pubout -out rsa_key.pub
3. Assign the public key to your Snowflake user (run in Snowsight):ALTER USER your_username SET RSA_PUBLIC_KEY='<paste contents of rsa_key.pub, excluding header/footer lines>';
What to paste into Adriel: The full contents of the rsa_key.p8 file, including the -----BEGIN PRIVATE KEY----- and -----END PRIVATE KEY----- lines.
Instructions
- Move to Adriel's Connections page.
- Type "Facebook Page Public" into the search bar.
- Fill in the 3 Required Fields and 1 Optional Field retrieved in the Prerequisite step, then click "Submit".
- Now, select the 4 Required Fields using the dropdown lists.

- If needed, configure the optional fields below and click "Submit".

cf. How to set Alternative Channel Name for File/DB data source
It can take up to one working day for your data to arrive.